Vision is arguably one of the most crucial, yet intimidating mechanics in League of Legends, especially for newer players who aren’t too familiar with the concept. Unlike other games where your vision is determined by your camera’s field of view or an unobstructed line of sight, League of Legends takes a different approach with the inclusion of the “Fog of War” mechanic, adding a whole new layer of strategy; You’re free to pan your camera on the entire map, but without proper warding and well-established vision, your team is as good as blind. It’s like navigating the map practically blindfolded—unless you’ve taken the time to set up wards and maintain vision, you’ll have no clue where the enemy is, making it easier for them to surprise your team and catch you off guard.
Vision isn’t just a convenience in League—it’s a critical aspect of gameplay that can change the course of a match and differentiate the bad players from the great ones. But being such an “easy to learn, hard to master” mechanic, most players either sit on their wards all game or drop them haphazardly whenever they’re off cooldown. What they don't realize is that countless games are won or lost because of a single well-placed (or poorly placed) ward.
Mastering vision is about timing, positioning, and reading the game—and those who understand this wield a serious advantage over the competition. That’s exactly why we’ve put together this guide—to walk you through everything from the fundamentals of warding to more advanced strategies. We’re not here to bombard you with specific warding locations or lineups to memorize like a test (though we’ll cover some of those too). Instead, we’ll focus on the thought process behind each ward placement. Our goal is to help you understand the reasoning so you can adapt and apply these insights to any situation. This way, you’ll be using vision to adeptly outplay your opponents and secure those wins!
Imagine, for a moment, a game where one team has permanent knowledge of the other team’s positions while the other side is completely in the dark. Sounds like wall hacks, right? That’s basically what effective vision control in League of Legends can feel like. Wards are more than just beacons for basic vision, they’re playmaking setups. By placing totem wards strategically you’re creating opportunities for more aggressive, and borderline uncounterable plays.
If you're looking to practice your vision control and game mechanics in a stress-free environment, starting fresh with a level 30+ smurf account is a great option. It lets you focus on improving specific aspects of your gameplay while keeping your ranked climb unaffected.
Trinkets are also key to essentially drawing out the battlefield to your will. Think of them as placing every chess piece exactly where you want it to be before the fight. It’s right there in the name: Vision Control. The team with the broadest line of sight is the one that controls the fight and the entire flow of the game. By maintaining superior vision, your team can set up for plays, collapse on enemies, and secure objectives with confidence.
While wards are great for offense, they’re equally, if not more impactful on the defensive. This duality is what makes vision such a powerful tool for skill expression. On one hand, good wards can be used to snowball leads and push forward. On the other, they serve to help you bounce back and regain agency in the match when falling behind. A single well-placed ward can completely dismantle the sneakiest of your enemy’s engages, saving you from a surprise flank or gank. It provides your team with the crucial heads-up to either avoid danger or seize the opportunity to turn the tables.
That’s the beauty of wards—they’re your tools for both anticipating and countering aggressive plays before they even happen, while also setting the stage for your own future engages. Be it defending or attacking, wards give you the foresight you need to always stay one step ahead.
While the term “ward” is mostly used to refer to the yellow trinket (Stealth Ward), the official League of Legends Wiki defines it more broadly as “a deployable unit that removes the fog of war over the surrounding area.” This means, yes, Ghost Poro technically counts as a ward too. In fact, there are 6 distinct wards in the game (one of them is reserved for Fiddlesticks because he’s cute). This range of vision tools gives you more adaptability depending on the situation you’re facing.
Since one of these wards is exclusive to a champion and 2 others are linked to certain runes, that leaves 4 vision control items—including sweepers—that are generally accessible to everyone on the map.
So let’s go over the different types of wards, discussing their perks, uses, and how they fit into various situations:

Let’s kick things off with the most basic ward: the Yellow Trinket. These are the bread and butter of vision control in League of Legends and are accessible to everyone from the start of the game. Their functionality is as straightforward as it gets. When placed (with a maximum cast range of 600 units), Stealth Wards provide vision over a small area, covering a 900-unit radius, for a duration of 90 to 120 seconds depending on the game’s phase. They’re also the only deployable vision control item that remains completely invisible throughout its lifetime—unless, of course, spotted by a Control Ward, Sweepers, Umbral Glaive, or Scryer’s Bloom.
Though simple, these wards are critical to map control—giving you crucial information about enemy movement and jungle activity early on. Even as the game progresses and vision clearing becomes more aggressive, Trinket Wards remain a valuable tool for area control and team disruption. They help shape how teamfights are played out, especially around key objectives like Baron or Dragon.
Stealth Wards are either obtained passively as a trinket item or through upgraded support items, making vision control a shared responsibility—but especially important for the support role. Support players are often tasked with maintaining vision over key traffic areas and clearing enemy wards. However, this doesn’t mean the rest of the team should solely play off the support’s vision, completely disregarding their own.
I’ve seen way too many games where ADC and Top players have a measly 3 or 4 vision score by the end of the match. Come on guys, use your wards! They’re a game-changer, no matter what role you’re playing. And if you're curious about how the vision score system works, make sure to check out our article regarding it.

Did you know that there was a time when wards weren’t free at all? Back in the day, they could only be purchased from the store, making vision control a real investment. But that changed with the introduction of the trinket system in Season 3, which passively provides free wards over time. Despite this, Control Wards remained a paid item, simply for how broken they are!
To maximize your impact in games, consider using a ranked-ready LoL account. With access to higher-level competition, you’ll learn to use vision tools like Control Wards more effectively against skilled opponents.
It’s baffling that even now when vision is so crucial, many players still overlook Control Wards. For such a cheap price, they offer incredible value for your entire time while exerting immense pressure on the enemy team—even if they spot it, they have to take time to clear it, which can force them into risky situations.
Let me be the control ward salesman here for a second; For only 75 gold, you get a totem that grants you True Sight over an area! Yes, you heard that right—an area of 900 units where no enemy wards function, no traps are effective and no sneaky invisible enemy can surprise you. But that’s not all! This bad boy can stay up permanently, potentially giving you control of a choke point for the entire game. If this doesn’t convince my AI teammates to buy them, I honestly don’t know what would.
Granted, it’s not invisible to the enemy and can be cleared with just 4 hits. But if placed well in a hidden spot and effectively protected, it can force your opponents into awkward positions just to clear it. What if it does go down? No problem—you can just buy another one right away! Ideally, you should always have 2 Control Wards in your inventory at all times, no matter if you’re saving up for an item or if your ADC ego is giving you grief. Just buy them! They deny enemy vision effectively and are such a small investment with a massive impact, and they can be the key to maintaining map control, disrupting enemy strategies, and countering an entire class of stealthy and trap-based champions.

I know, I know… Oracle Lens isn’t technically a ward, but if you want to master every nook and cranny of vision control, keeping sweepers on your radar is crucial. They’re the second most frequent vision control item you’ll encounter in your games, simply because they can be equipped as a trinket item from level 1.
Unlike traditional wards, sweepers aren’t about gathering information—they’re all about denying vision. They’re essentially temporary Control Wards that follow you around for 2 seconds. They reveal and disable enemy Wards and traps, but they don’t grant vision on the area itself. That’s why Oracle Lens is generally regarded as a reactive item, designed to respond to enemy wards rather than creating vision for your own team. However, they can still be used proactively to secure safe paths through the fog of war while staying unspotted. This makes them especially crucial for junglers (except Lee Sin of course), who need to clear enemy vision while moving through the jungle or setting up ganks.
Since vision control relies on vision denial as much as it does on vision coverage, one or two Oracle Lenses*—usually equipped by the support and jungler—are necessary to bend the fog of war in your favor and keeping your enemies in the dark. Unless, of course, you’re up against an enemy Teemo—then, well, even 5 sweepers wouldn’t be enough to clear the WWII minefields you’re about to go through!*
In essence, even though they might seem quite underwhelming on the surface, Oracle Lenses are a must-have in every composition to ensure that your team can see where the enemies are and deny them the same luxury at all times.

Perhaps being the most overlooked ward in the game—mainly because it's only unlocked at level 9—**Farsight Alteration seems quite mediocre at first glance. While it might be overshadowed 70% of the time by its cooler cousin—*the Stealth Ward*— it can be the defining factor in the other 30%.
Sure, you’re limited to just 1 Farsight Alteration in your inventory at a time, and it might have a smaller vision radius (500 units) than the normal Stealth ward, autodestructs when an enemy walks by and can be destroyed in one hit. However, it’s not meant to serve the same purpose as the Yellow Trinket in the first place.
Farsight Alteration is designed with one primary purpose in mind: to answer the question, “Are the enemies there NOW?” It excels at providing immediate, long-range vision to check areas or objectives from a safe distance, making it an invaluable tool for spotting enemies and securing information when you need it most.
Given its 4000 units cast range—or 400 Teemos in freedom units—Farsight is excellent for scouting objectives, checking over dangerous areas, or providing long-range vision without leaving safety. This makes them especially valuable for AD Carries and top laners who want to keep tabs on the enemy team while playing safely. They don’t typically ward in the first place so its long cooldown wouldn’t really bother them.
The vision provided by the Blue Trinket also operates quite differently from any other ward, as it immediately reveals everything in an 800-unit radius for 2 seconds upon being placed and after spotting an enemy—yes, that includes vision inside bushes and through terrain. This allows you to get a quick snapshot of the situation, giving you time to assess enemy positions and respond accordingly.
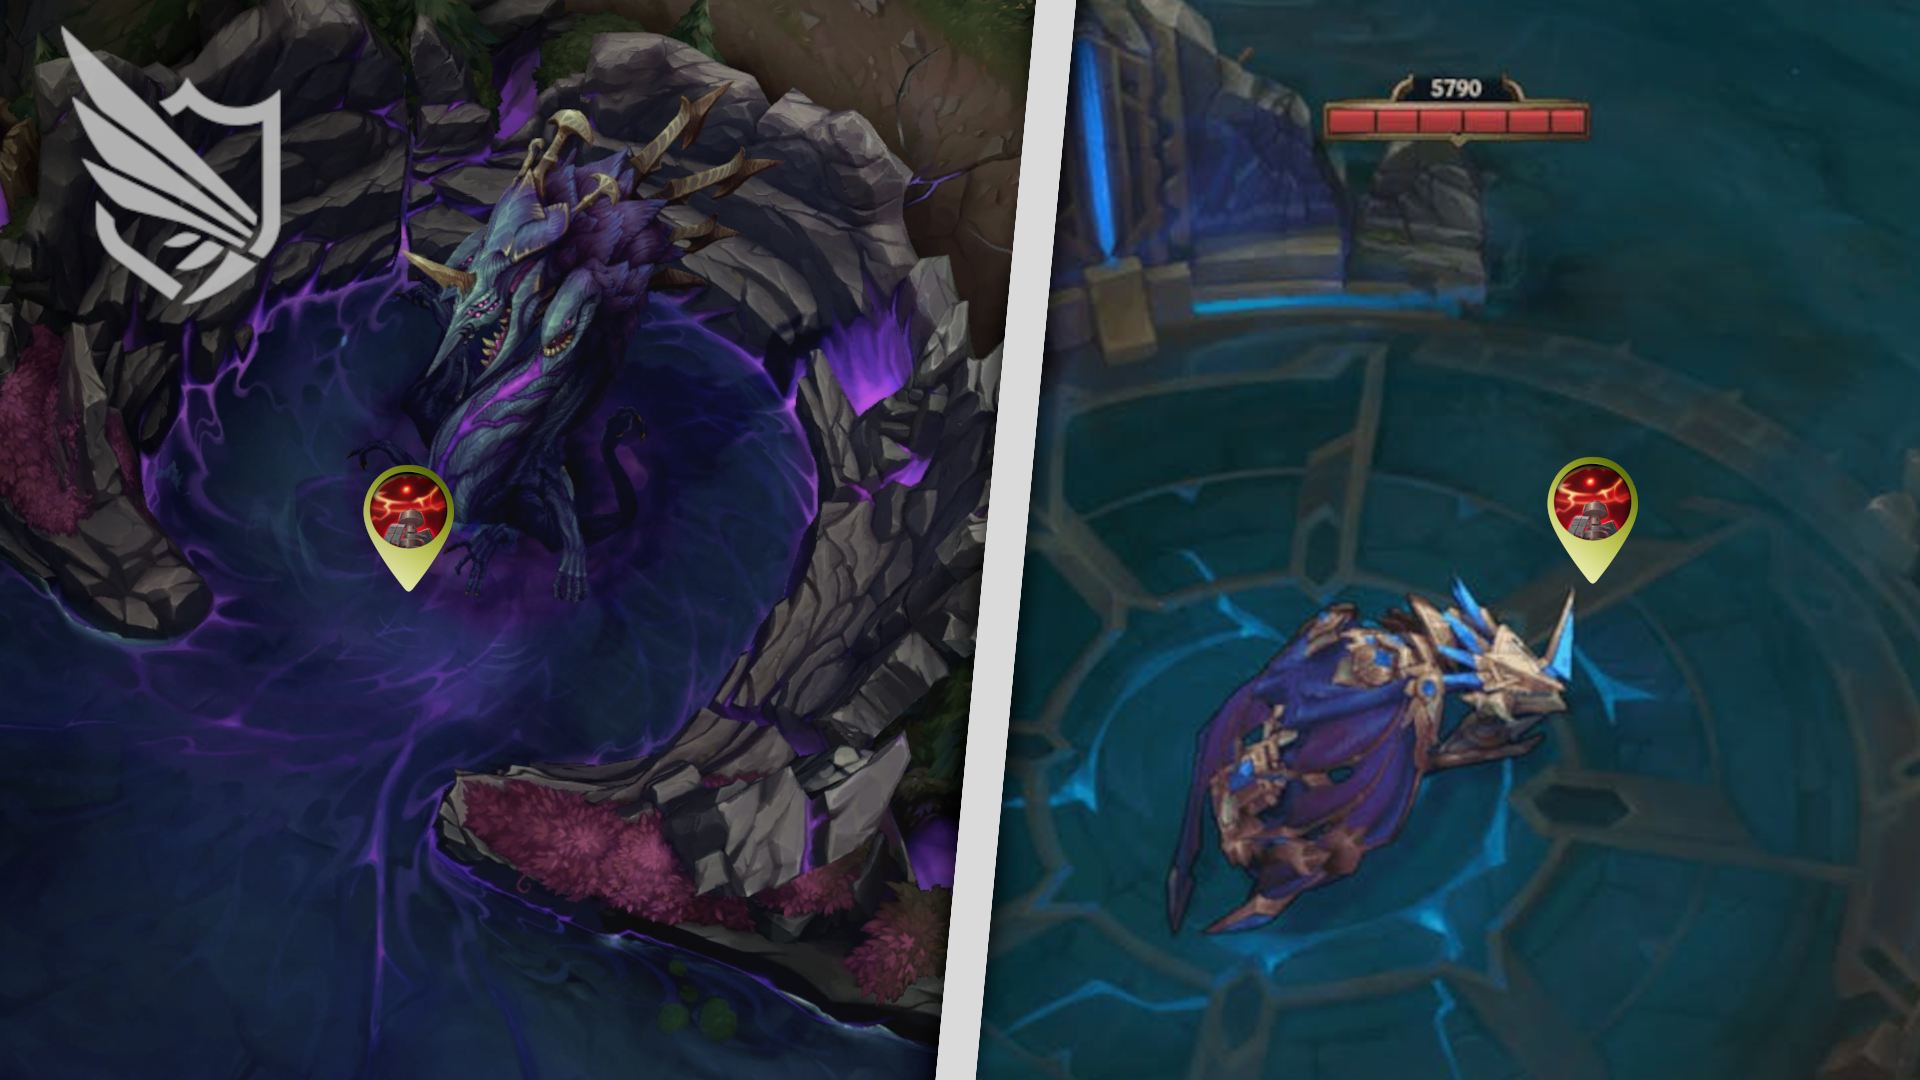
The most obvious use of this trinket is to check on Dragon or Baron if you suspect that the enemy team is rushing them. However, it also has a more defensive application that can potentially save your butt—placing it in your own jungle! “But doesn’t it destroy itself whenever it spots an enemy?” Yes, but it also stays active permanently until an enemy goes by. Just knowing that your jungle is being invaded can be enough information to plan a collapse or group up with your team.
In addition to the standard trinkets, other, more niche means of vision control also play a role in shifting the tides of battle. While you won’t encounter them in every game, I think they’re necessary to be aware of them so you can play around these tools and incorporate them into your builds. Let’s glance over them really quickly:


Now comes the meaty part of the guide. You’re familiar with the various tools for vision coverage, denial, and control, but the real question is: how do you use them effectively?
As we’ve previously mentioned, we could just go over the meta ward placements and have you memorize them like a cheat sheet. But just like in high school, cheat sheets only get you so far. What truly helps you master warding is understanding the underlying concepts and being adaptable in the ever-changing landscape of the game.
Here are some general tips to help you build a solid foundation for making better warding decisions on your own:
Watching replays also goes a long way, even beyond warding. So, make it a habit of watching games you thought were too close and ones that you could’ve improved upon—and there’s always something to improve!
These are general, decision-oriented tips to put you on the right track for refining your vision control yourself. There is no cookie-cutter setup for optimal coverage, nor is there an God- Ward that would come in clutch every game. But there are godlike ward for every specific setting, and being able to spot them and utilize them to gain the edge over your opponent is the simple recipe for mastering vision and warding.
There are, however, some fundamental, role-specific strategies that revolve around warding. These will generally be beneficial, and you should keep them at the back of your mind as you approach warding. These will provide you with a strong framework for vision control, helping you contribute effectively wherever you are.
Here’s a breakdown of how to leverage your vision tools across different roles:
Due to the geographically isolated nature of top lane, your impact during the early-to-mid game hardly, if ever, affects the rest of the team. Sure, an early pick against the enemy toplaner basically wins you the lane in most situations, but that doesn’t translate into a map-wide impact until later in the match, at which point an enemy or two might be straight up farming your team.
The point is, that you need to capitalize on your early leads and snowball, radiating your advantage all across the map. And what better way to snowball early leads than by undermining the most impactful opponent in the early game; The Jungler. Given the absence of the enemy top (because he’s dead lol), take that as an opportunity to instill deeper wards inside the enemy topside jungle, keeping it under active surveillance.
Granted, you need to be sure that you can at least 1v1 the enemy jungler in case he’s luring there, so you should ideally have some information about his general whereabouts beforehand. In higher elo games, such plays will be predictable, making it very likely for the enemy mid to preemptively shove their wave and rotate to defend their jungle. In that case, coordinate with your midlaner to stop his rotation—either by aggressive trading, hard pushing, or joining you—giving you free rein over the enemy jungle.
There is a reason why this tactic is often disrupted in high elo, simply because it’s absolutely busted! We don’t have to explain why deep vision is so impactful since we already did, but trust me, the enemy jungler won’t be happy about it ;)
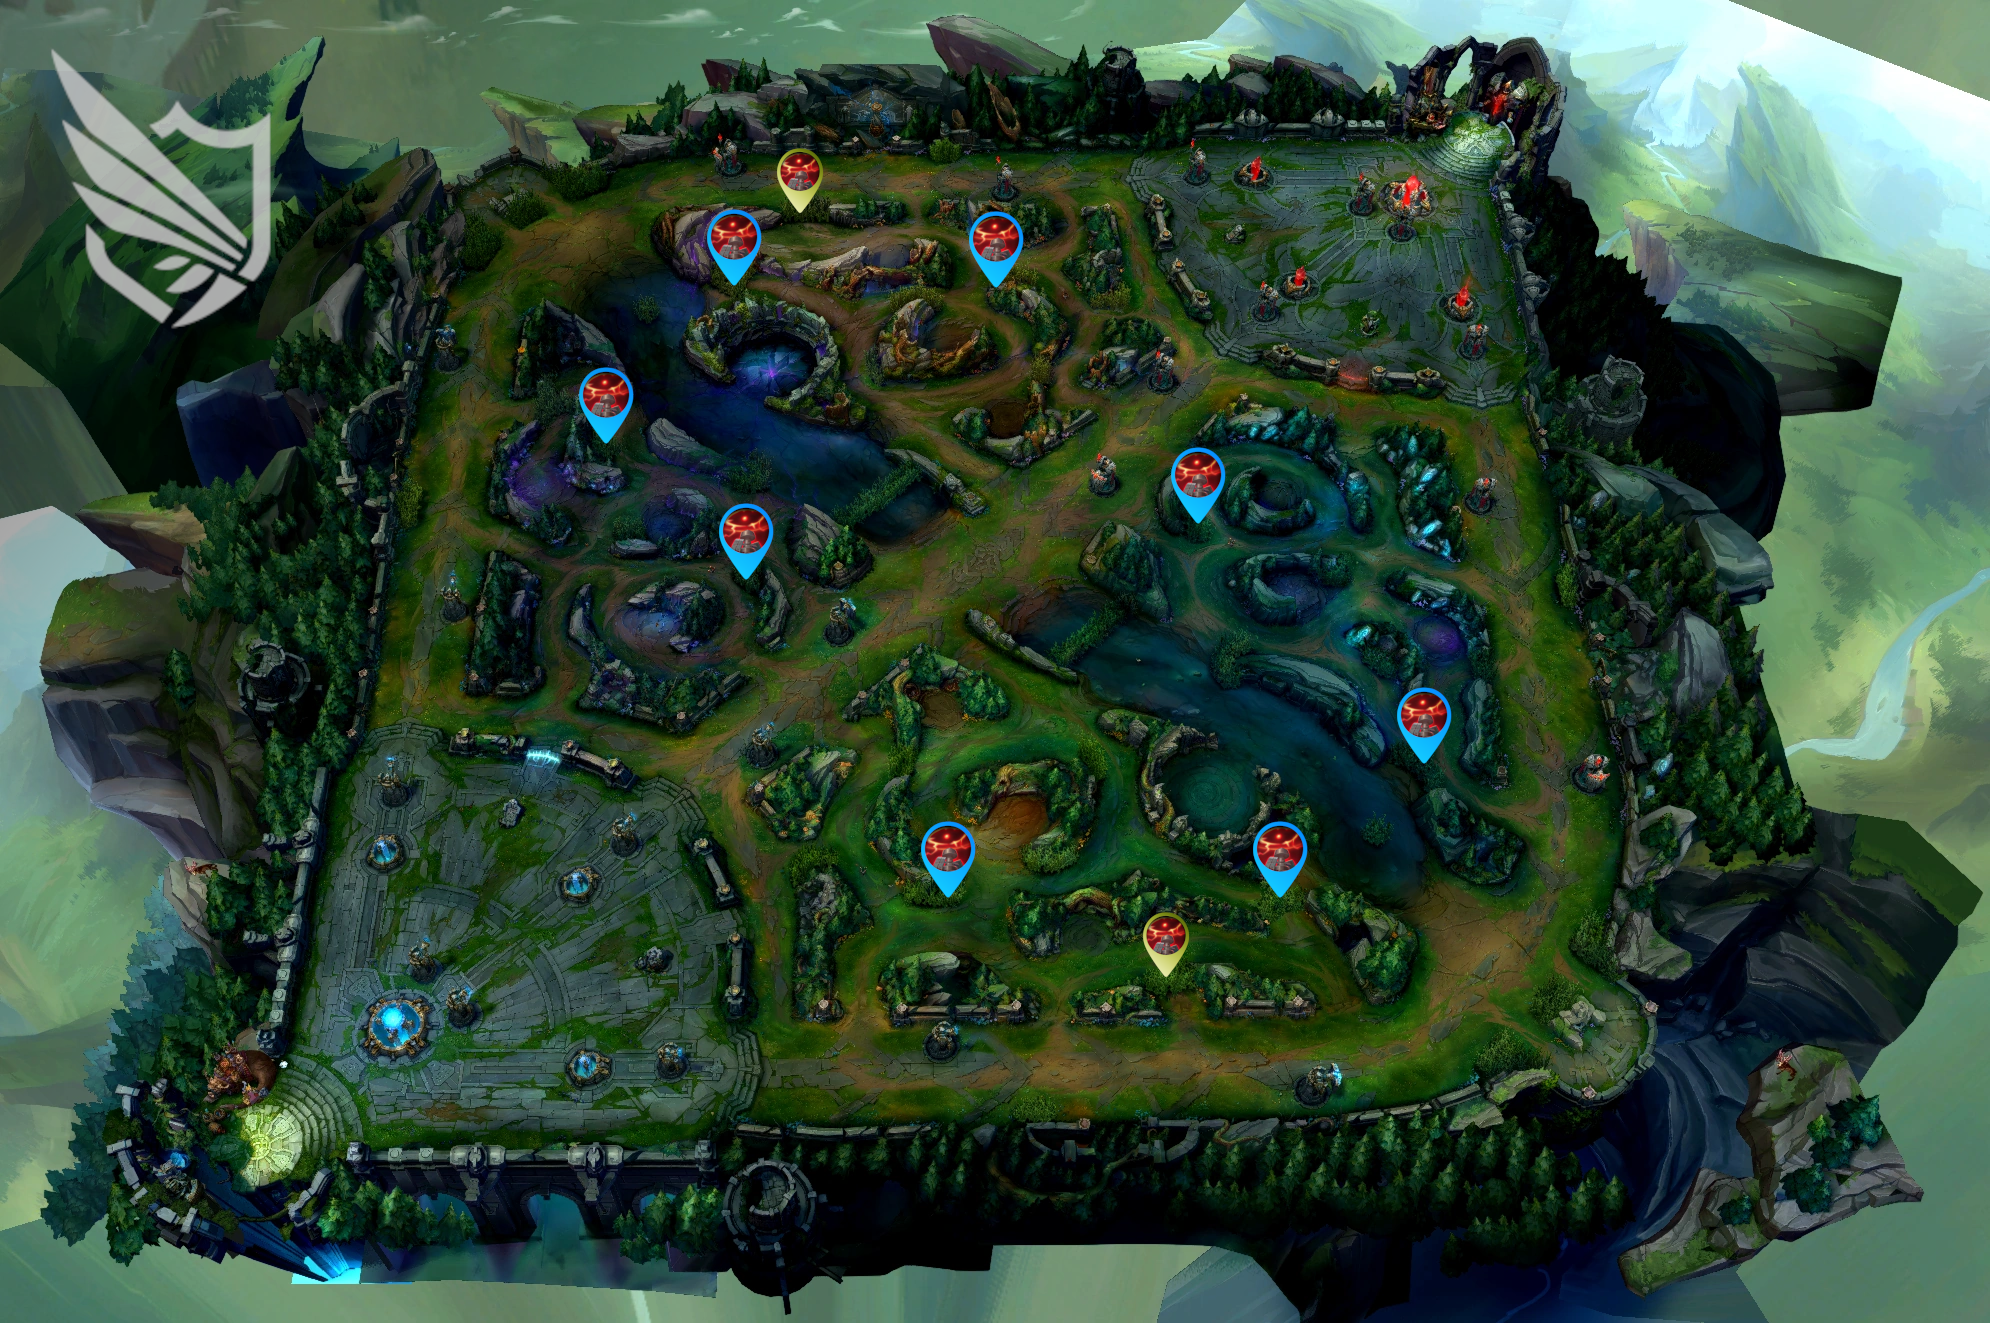
As a midlaner, your position at the center of the map enables you to set up more proactive wards in key locations even off of small tempo leads. Take advantage of these timing windows to set up vision around enemy jungle camps—raptors and Red Buff specifically. These will take you 5 seconds at max, and will provide your team crucial insight on the jungler’s positioning, his clear, as well as his camps’ respawn times. Not only does this contribute to your team’s overall map control, but knowing the exact moment when the enemy camps respawn gives your jungler the opportunity to plan an invade and potentially steal them uncontested.
You don’t even have to wait for the game to start to exert your pressure, a simple trinket around Raptors at 1:20 can provide you with enough information to predict the jungler’s position for the next 3 minutes! Yes, an unimpressive ward in plain sight gives you enough intel to avoid ganks for nearly half the laning phase. This strategy is so oppressive that enemies will usually equip Sweepers at level 1 just to stop it, how crazy is that?!
Wards are more than just aggressive tools in your arsenal though; their defensive uses, especially in the mid lane, are enough to halt ganks in the early game and save you from otherwise devastating situations. With 6 potential ganking paths in the midlane, it might seem borderline impossible to defend with wards alone. However, you can effectively manage these threats with a solid ward placement—yeah, just one!
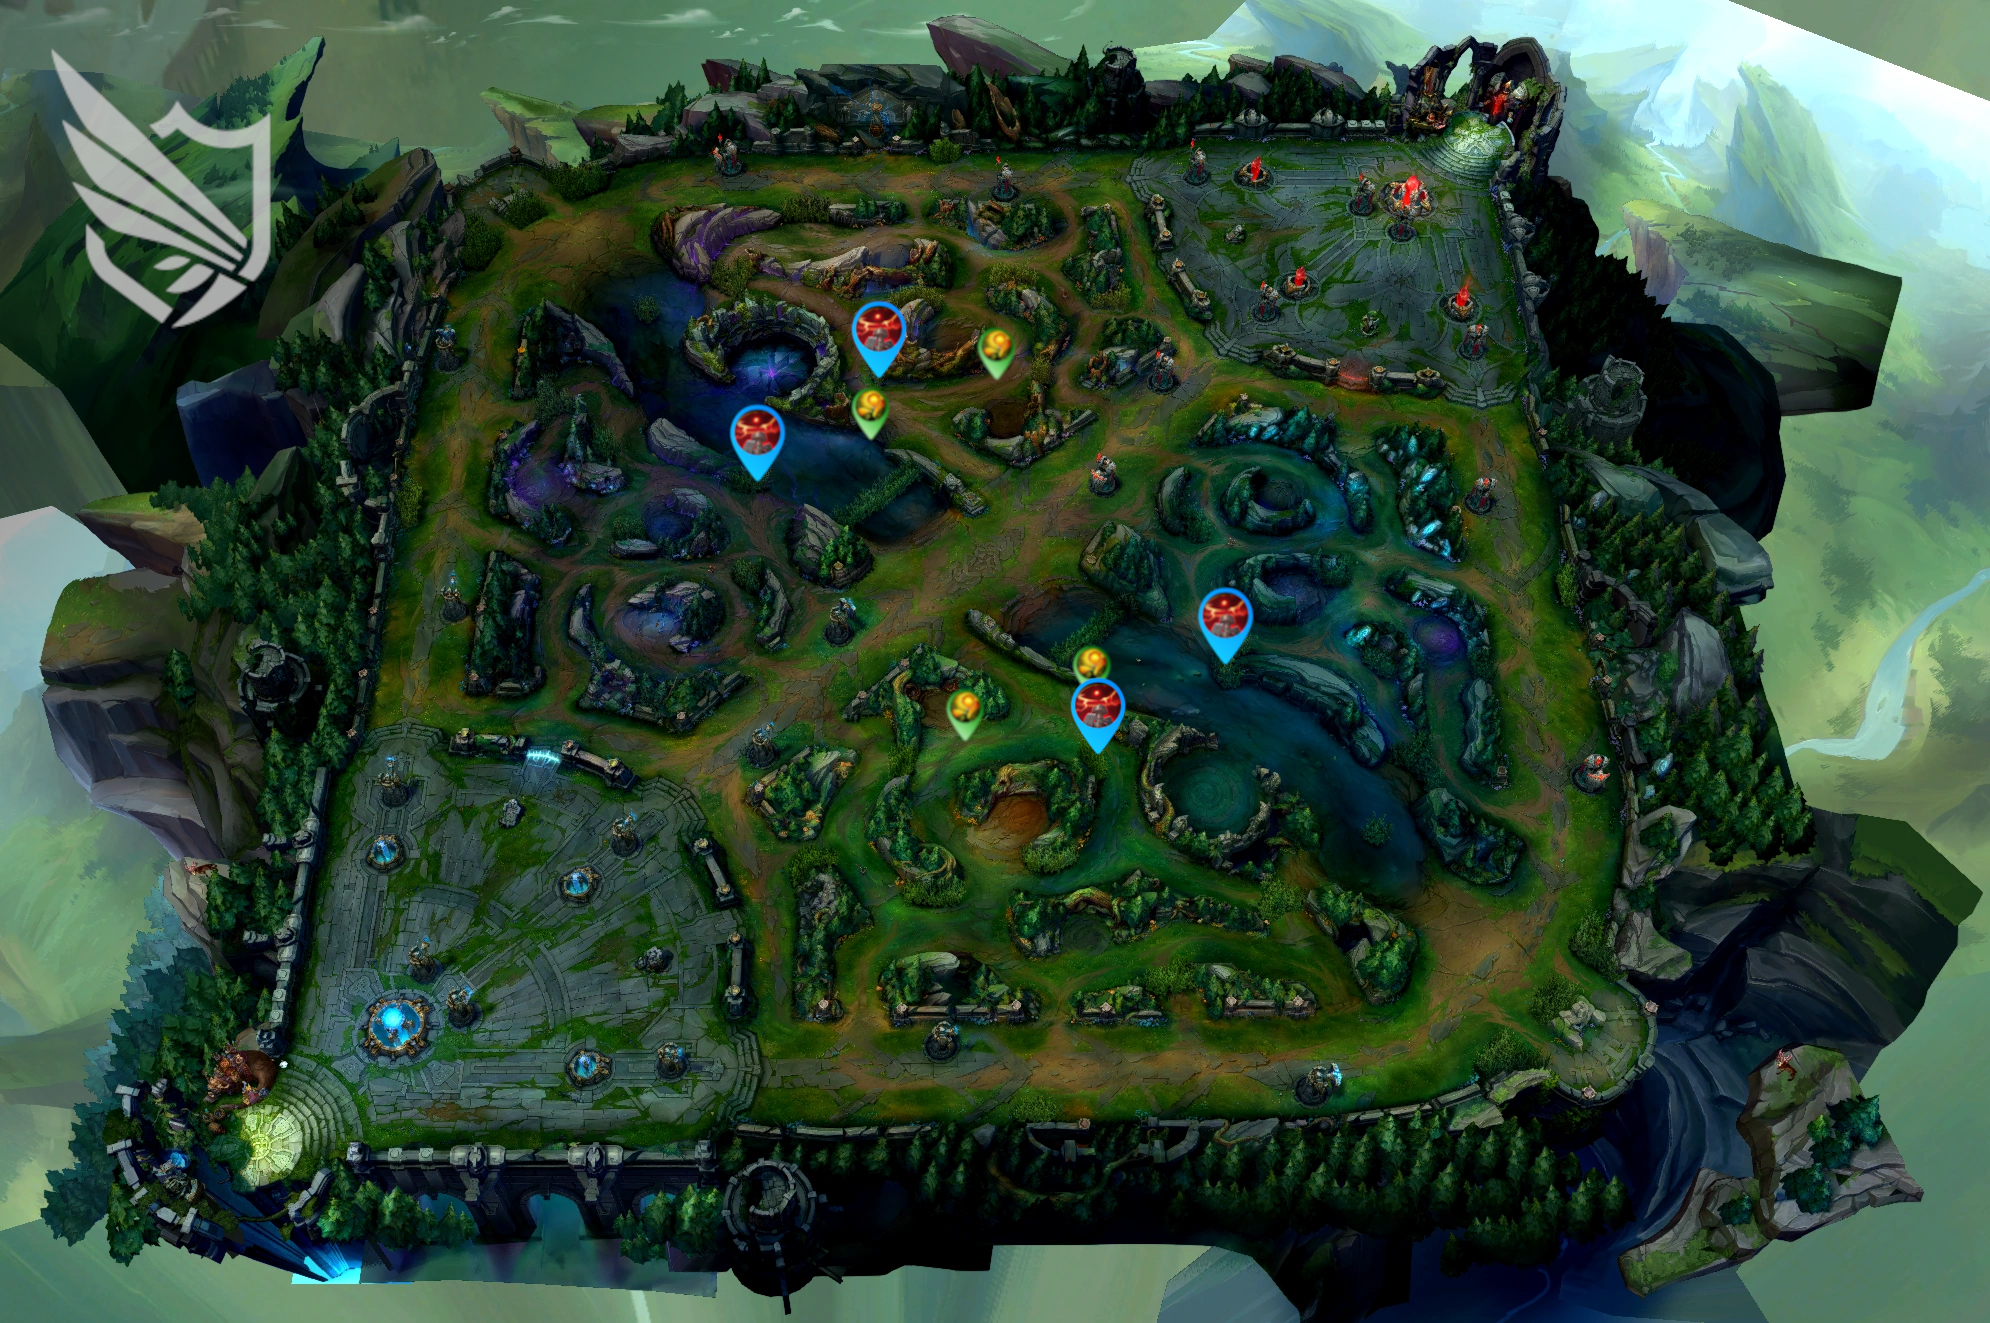
First of all, avoid warding the side bushes. It might seem tempting because of how easy it to do so, but trust me, there are far better uses of your precious trinkets than that. They only cover one of the six aforementioned paths, still leaving you vulnerable to ganks from pretty much everywhere else. They’re also positioned too close to the lane, meaning that—even if they do spot an enemy—you might not have enough time to react and could get caught before reaching your tower if you’re just slightly overextended.
With that said, a more optimal ward placement would be at the river entrance of the enemy jungler (as seen in the figure). Not only do they cover two critical paths instead of just one, but they’re also able to spot a rotating jungler or a roaming support much earlier, giving you enough time to assess the situation and retreat if necessary. Not only do these ward help prevent ganks, but they’re also positioned in an area frequently traversedd by the enemy jungler. So, even if they’re not necessarily trying to gank you, you’ll still be able to spot them rotating around camps and to between lanes.
“But you’ve said that there are 6 pathways to kill me, how is a ward covering only two of them gonna save me?!”. Well, that boils down to positioning, which is beyond the scope of this guide. But to give you a heads up: always try to position yourself on the side of the lane where you’ve set up vision, especially as you push waves further down the lane. This way, you’ll create enough distance between yourself and the opponent, allowing you to safely retreat to your turret or quickly sprint to the river where allies can assist you.
Being the roaming beacon of freedom and salvation that you are, you and the support player bear the critical responsibility of clearing up as much fog of war as possible, filling your opponent’s minimap with this desaturated darkness at the same time! We know how much weight is already on your shoulders, but with great powers comes great responsibility!
Since you’ll mostly be equipping Oracle Lens for stealthier ganks, you won’t really be utilizing it until further in the game—when you’re actually ready to gank. At that point, you’d already have two trinkets anyway. So, a common tactic to get free value and avoid stacking wards in your inventory is to place a Stealth Ward around enemy Raptors at 0:50, or drop it at your own jungle’s entrances at 0:30—especially if the enemy team has a hooking support. Afterward, you can safely recall and swap to sweepers, losing no tempo whatsoever. It’s essentially a free ward that could potentially give you insight into your opponent’s pathing or warn you about a level 1 invade without having to face check—we all know how that story ends. Even if this ward ends up providing no value, it wasn’t that big of an investment to begin with, so the risk-to-reward ratio is basically infinite.
As a jungler, you’re also the biggest beneficiary of Control Wards. Since you won’t usually have access to other warding trinkets due to your reliance on Sweepers, Pink wards are a great alternative for expanding your team’s line of sight. Your high mobility and freedom also let you venture deep into enemy territory, setting up control wards in their jungle and key entrances between your camp rotations. A prime opportunity to execute such plays is when you spot the enemy jungler on the opposite side of the map. This allows you to invade your side of the jungle freely, set up vision, and steal camps without fear of immediate retaliation.
In conclusion, ALWAYS have 2 Control Wards in your backpack!
I know every ADC’s instinct is to scroll right through this section immediately, but stick with me for a second. I know you don’t really care what these colorful shiny things do—it’s your support’s job to take care of them anyway… right? Well, consider this: you end up generating around *11 wards in an average 30-minute game. These are 11 opportunities to prevent ganks, avoid danger, and exert pressure. But noooo… that death was a “JunGLe GaP”*.
Anyway, the point is that, by abstaining from warding, you’re alleviating pressure from the enemy and essentially conceding the vision control game altogether. This is free value you’re leaving on the table, so why not step up and… you know, help your team? Your support doesn’t have infinite wards despite what you might think. Every little bit counts, and your contribution can really turn the tide—especially in such a volatile lane like Bot.
During the early game, when your support still hasn’t upgraded their item, vision is scarce. So it’s your job to help them out when their trinkets are on cooldown. Play off of pushes and use that free time to venture down the river or into the enemy jungle, as long as it’s safe to do so. It doesn’t have to be anything too fancy; a Ward on Dragon or the enemy’s Blue or Red buff can go a long way. Consume blastcones and jungle plants, while you’re at it, to make it even harder for the enemy jungler to move around.
As soon as you hit level 9, however, switch your trinket item to a Farsight Alteration. It provides value from a safe distance and takes no commitment to activate it—Like, the item was literally made for you! Besides scouting objectives, use it to cover your butt whenever you’re split-pushing. Also, whenever you’re in base with some leftover change, pick up a control ward, especially if you’re about to contest an objective. Just remember to place it.
I don’t want to see another AD Carry with less than 10 vision score in post-game, just because “wards don’t do damage, so why bother”. If the game was all about dealing damage we’d be playing TF2 and not League. Take the initiative, and be the change you want to see on your team. Warding might not be as flashy as big damage numbers, but it’s often the reason you’re alive to dish out that damage in the first place.
I don’t think there’s anything left to tell support players. You’re the eyes of your team; your entire kit, role, and identity revolves around assisting your teammates in every way possible, including vision control. Not only should you set up your own vision, but also defend it while clearing the enemy’s.
During the laning phase, it’s practically a 1v1 between you and the other support for control over the river paths, so mix up a bit of wave management to guarantee that upper hand—brains over brawn, people! Play off of wave rebounds—when your opponents are stuck farming under tower—to clear trinkets and drop control wards around the pixel brush and the two tri-brushes. As long as you maintain rein over vision in that area, the lane is practically ungankable, and you could approach your enemies however you like knowing that you have a guaranteed exit if things get out of hand.
As the game goes on and you gain more and more stacks on your item, consider swapping your Ward for an Oracle Lens when you’re around the 350~400 mark. This enables reactive vision control—through clearing enemy trinkets—way before anyone else. Add a Control Ward and you’re basically a walking lighthouse, guiding your team through the fog of war with confidence.
You can’t just go over and clear wards for free though, some specific timing windows allow you to do so while minimizing XP loss from minions. The basic principle is to only go for sweeper plays if you lose no more than 3 minions’ worth of XP by the time you get back to lane—as it’s roughly equivalent to the XP gained from clearing a single ward.
Prioritize accompanying your jungler whenever he’s invading the opponent’s side, watching his back for possible retaliation and setting up deep vision in enemy territory for free.
In addition to the obvious strategies and general practices, various lesser-known tips can give you that extra edge in some rare circumstances or otherwise just help with your overall understanding of the game. Here’s a collection of obscure tips and trivia that might not be in the standard playbook but can certainly add a layer of sophistication to your vision control game:
These timings aren’t mathematical constants though, so you won’t have to memorize them by heart. Instead, use your own jungler’s level as a reference for the enemy’s. At such an early point in the game, the level gap won’t last more than a few seconds at most, but some knowledge about the opponent’s clear speed would also help you in this regard.
These cameras in plain sight can also be used to top of dead inhibitors, helping you keep track of enemy numbers and force skirmishes where you have the numbers advantage.
This might seem like an insignificant advantage, but for assassins who unlock their lethal combo with 2 abilities, hitting their power spike just a couple of seconds earlier can spell doom for the opponent!
I think Sun Tzu put it perfectly when he said, “Supreme excellence consists of breaking the enemy’s resistance without fighting.” This is the essence of vision control in League of Legends. Wards are merely tools, much like summoner spells, distributed equally among players. It’s up to you to wield every tool in your arsenal—every butter knife and every dagger—with precision and strategy.
Vision control is like as valuable as every other mechanic, requiring constant trial and error to finally master. It’s the art of anticipating your opponents and oppressive surveillance to render their attempts at resistance futile.
So stay vigilant, place wards with intention, and soon you'll see the impact these little shiny fellas can have on your journey!